Add Blender 3D models (.glb) to your video — spin, animate and light them with Claude
How to put a 3D model from Blender (.glb) into a video animation by asking Claude. Covers exporting from Blender, example requests, playing the animation inside the model, fixing metal that looks black, file-size limits and troubleshooting.
What you can do
You can ask Claude to place a 3D model (a .glb file) made in Blender or another tool inside a video animation. Spinning it, moving the camera in, and playing the animation built into the model (walking, waving) at a time you choose are all things you can ask for in plain words.
You can combine it with text and logos, using the model as a backdrop or the star of a title. The result lands on the timeline as an ordinary video clip, so cutting, arranging and color work behave like any other clip.
For the overall flow of making animations, see Have Claude make animations. This guide covers one part of it in depth: using your own 3D model.
Supported formats and sizes
Once Claude is connected to the editor (Claude integration), you just tell Claude where the .glb file is (its path on your computer). No upload is needed.
- Works — .glb (one file with the textures inside). Models compressed with Draco or Meshopt also work
- Doesn't work — models with KTX2-compressed textures, a split .gltf (with a .bin or images outside), and the .blend file itself. Export a .glb from Blender again
- Size — up to 100 MB per 3D model. One animation can take up to 16 files in total, counting photos and logos (SVG)
Other 3D tools that export glTF (.glb), and .glb files from model-sharing sites, work the same way. For models you didn't make, check the license and any credit requirements before using them.
Export a .glb from Blender
Names and locations of Blender's settings change a little between versions. This follows the official manual for Blender 4.2 LTS and 5.4.
- Select the model you want to export (if you only want part of the scene, keep it selected)
- Choose "File > Export > glTF 2.0 (.glb/.gltf)"
- Set "Format" to "glTF Binary (.glb)". The textures go inside a single file
- To export only what you selected, tick "Selected Objects" under "Include"
- "Apply Modifiers" under "Data" exports the shape with your modifiers applied. To shrink the file, you can also use "Draco Compression"
- For a model with motion, check what will be exported under "Animation". By default it exports the actions attached to the model
- Name the file and save
Things to watch for
- Materials — Principled BSDF-style materials are exported. Looks built from other node types are ignored and can change
- Curves — convert them to a mesh first
- Images — PNG and JPEG are the basics. Other formats are converted, which can slow the export
- Orientation — "Y Up" follows the glTF convention (Y is up); leave it as is
After exporting, open the file in a browser-based viewer such as the glTF Sample Viewer and check the look and the motion before giving it to Claude. It makes it much easier to tell where a problem comes from.
Ask Claude
Give the file's location and say how you want it shown.
- "Put ~/Models/robot.glb in the middle of the stage and spin it slowly once around"
- "Move the camera slowly toward the model and stop on a front view"
- "Use a deep blue gradient background and overlay the title 'NEW MODEL'"
- "Take that last animation, scale the model up 1.5 times and make it 2 seconds longer"
The model is saved inside the piece, so when you want to change a color or the length later, you can ask without handing over the file again. One animation can be up to 30 seconds.
Claude doesn't receive the file itself. The extension reads the file on your computer and hands it to the editor. What reaches Claude is only a summary: the triangle count, whether there are textures, and the names of any animations inside. Claude uses that summary to pick an animation by name or to notice a heavy model.
Play the animation inside the model
Motion you set up in Blender (walking, waving, dancing) can be played by name from a time you pick in the video. Claude knows the animation names from the summary above, so you don't have to remember them.
- "Play the Walk animation from 1 second, repeating"
- "Start with Wave, then switch to Dance at 2.5 seconds"
- "After the wave, hold the last pose"
The motion is worked out frame by frame from the video's time, so every export looks the same. You can choose to repeat it (loop) or hold the last pose. Switching to another animation blends smoothly.
A model with no animation can still be spun, approached by the camera, or moved around.
Getting the look right: light and reflections
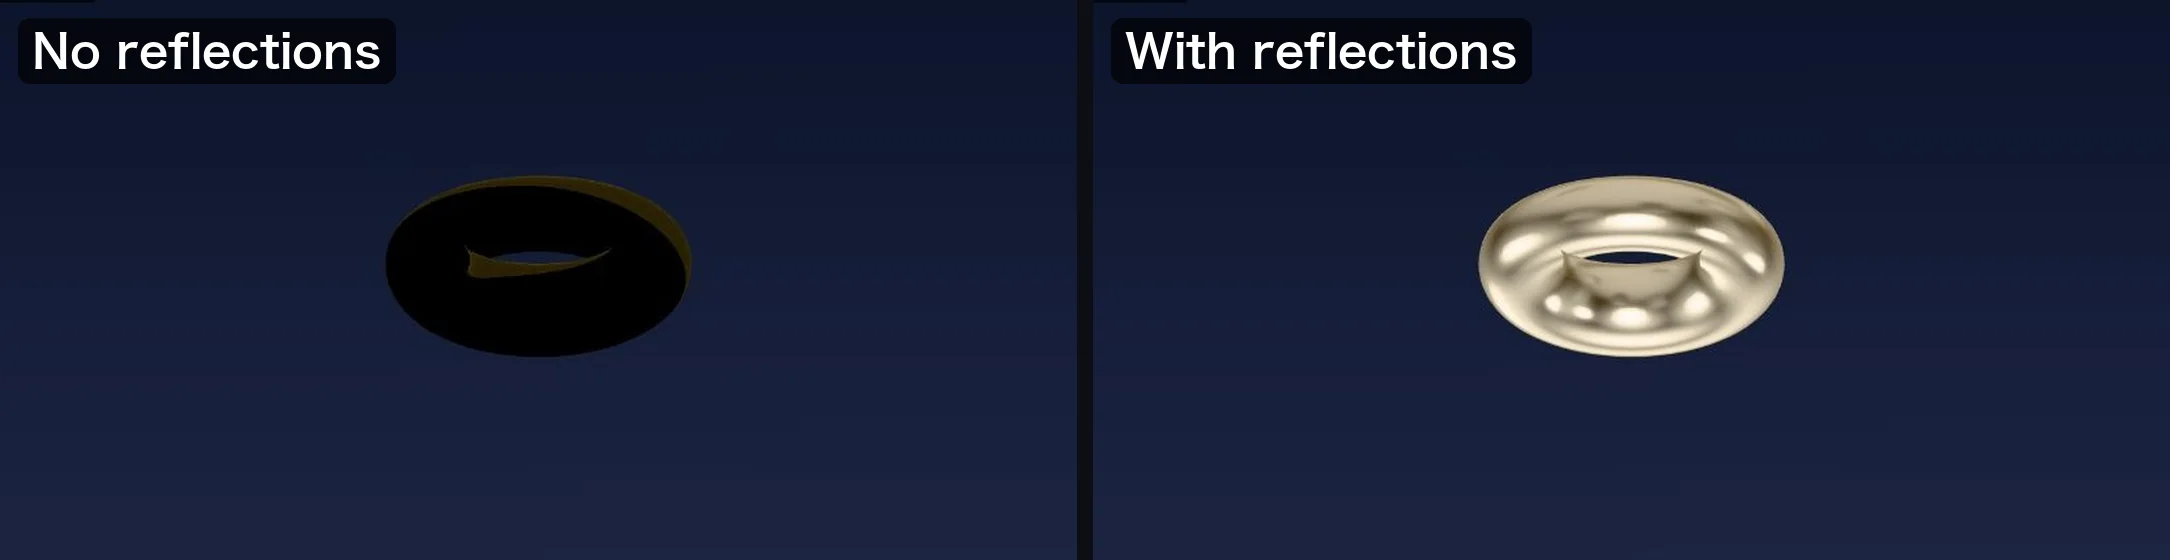
Metal and glossy materials turn black without reflections from their surroundings. VideoBuff's 3D scenes even warn about this. Tell Claude "the metal is black" or "it's too dark" and it can add reflections to fix it.
When you want a product's color shown as it is, say so (there's a way of drawing that doesn't shift colors). If you want shadows, ask for them.
We recommend laying text over the 3D as ordinary flat text. Keep the words you want read flat, and make the background or the star 3D.
File weight and how to lighten a model
You'll get a warning when a model has more than 2 million triangles or its textures total more than 64 MB. The 3D layer may slow down, or run out of graphics memory and fail to draw.
To lighten a model in Blender:
- Use "Draco Compression" in the export settings
- Lower the image quality (Image Quality), or shrink the texture images
- Leave out anything that isn't visible or isn't used
- Reduce the polygon count of overly fine shapes (for example with the Decimate modifier)
A low-poly, character-sized model is a few hundred to a few thousand triangles, which looks plenty good in a video scene.
When something goes wrong
- It stops with a message that an image refers to an outside file — that's a split .gltf. Set Blender's "Format" to "glTF Binary (.glb)" and export again
- Metal or glossy parts look black — there are no reflections. Ask Claude "the metal is black, add reflections"
- The orientation is off, or the size is wrong — ask Claude to "face it toward the camera" or "scale it up 1.5 times." In Blender, applying rotation and scale before exporting helps
- The animation doesn't play — check in Blender's "Animation" settings that the motion is exported, and open the file in a viewer to see whether it moves
- Colors or patterns differ from Blender — nodes other than Principled BSDF-style ones aren't exported. Open it in a viewer to compare the look
- It says the format isn't supported — KTX2-compressed textures and split .gltf files don't work. Export a .glb without KTX2
- The file is too big (over 100 MB) — try the tips in "File weight and how to lighten a model"
Limits and FAQ
Limits
- One animation can be up to 30 seconds. Split a longer scene into several and line them up
- It can't be laid over footage. The background can't be transparent, so use it as a scene before, after or between your footage
- A video can't be played inside the animation (photos, SVG logos and 3D models can)
- You can't adjust the model's position or motion from the editor's inspector. Ask Claude
FAQ
Q. Can I use this without Blender? A. Yes, if you have a .glb file. For models from sharing sites, check the license and any credit requirements.
Q. Can I hand over a .blend file as is? A. No. Export a .glb with "File > Export > glTF 2.0".
Q. Is my model data sent anywhere? A. The extension on your computer reads the file and hands it to the editor. The contents go to neither the VideoBuff server nor Claude. Claude only receives a summary such as the triangle count and animation names.
Q. Can I still edit by hand? A. Yes. The finished animation is an ordinary clip, so you can cut it, grade its color and add transitions in the editor yourself.